Sunday 28 July 2013

A quick Happy Birthday...

Today I'm just sharing a quick birthday card I made for a lady at work.
The file is from the Five Minute Cards kit and the paper is Harvest Spice from Shabby Princess. 

It was my first time using the print and cut feature on my Cameo and I couldn't believe how quick and easy it was. I simply imported the svg's into Silhouette Studio SD and then filled each piece with the pattern I wanted.  I then added some faux stitching and Happy birthday text in white.
I love that I was able to print it all out and cut every piece for this card in one go. Assembly was super quick - I simply adhered the first layer, added some dimensional dots to the second layer, a few brads and... viola!  All done in no time!
 
Thanks for stopping by!
 

Image Hosted by ImageShack.us
 

Saturday 20 July 2013

Doll House Mansion

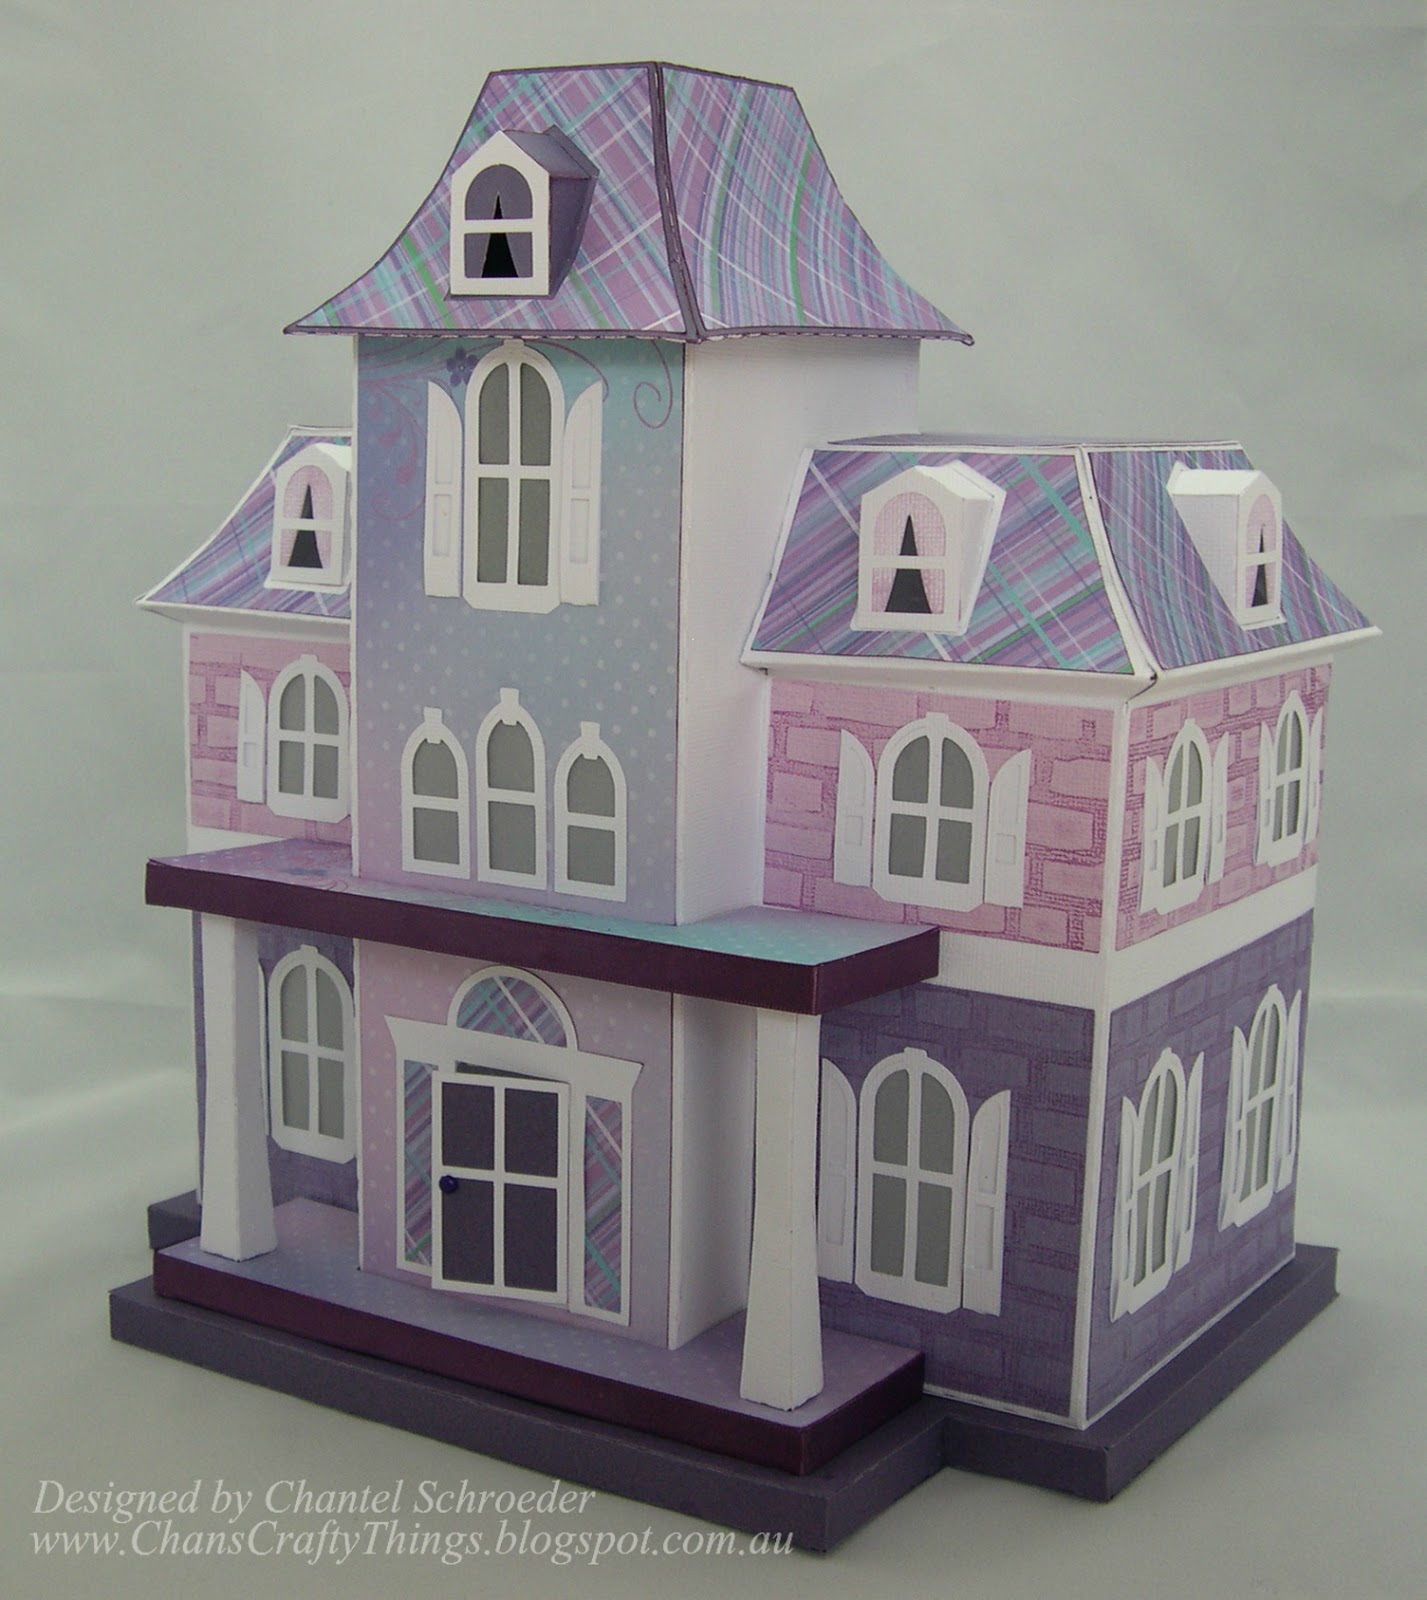
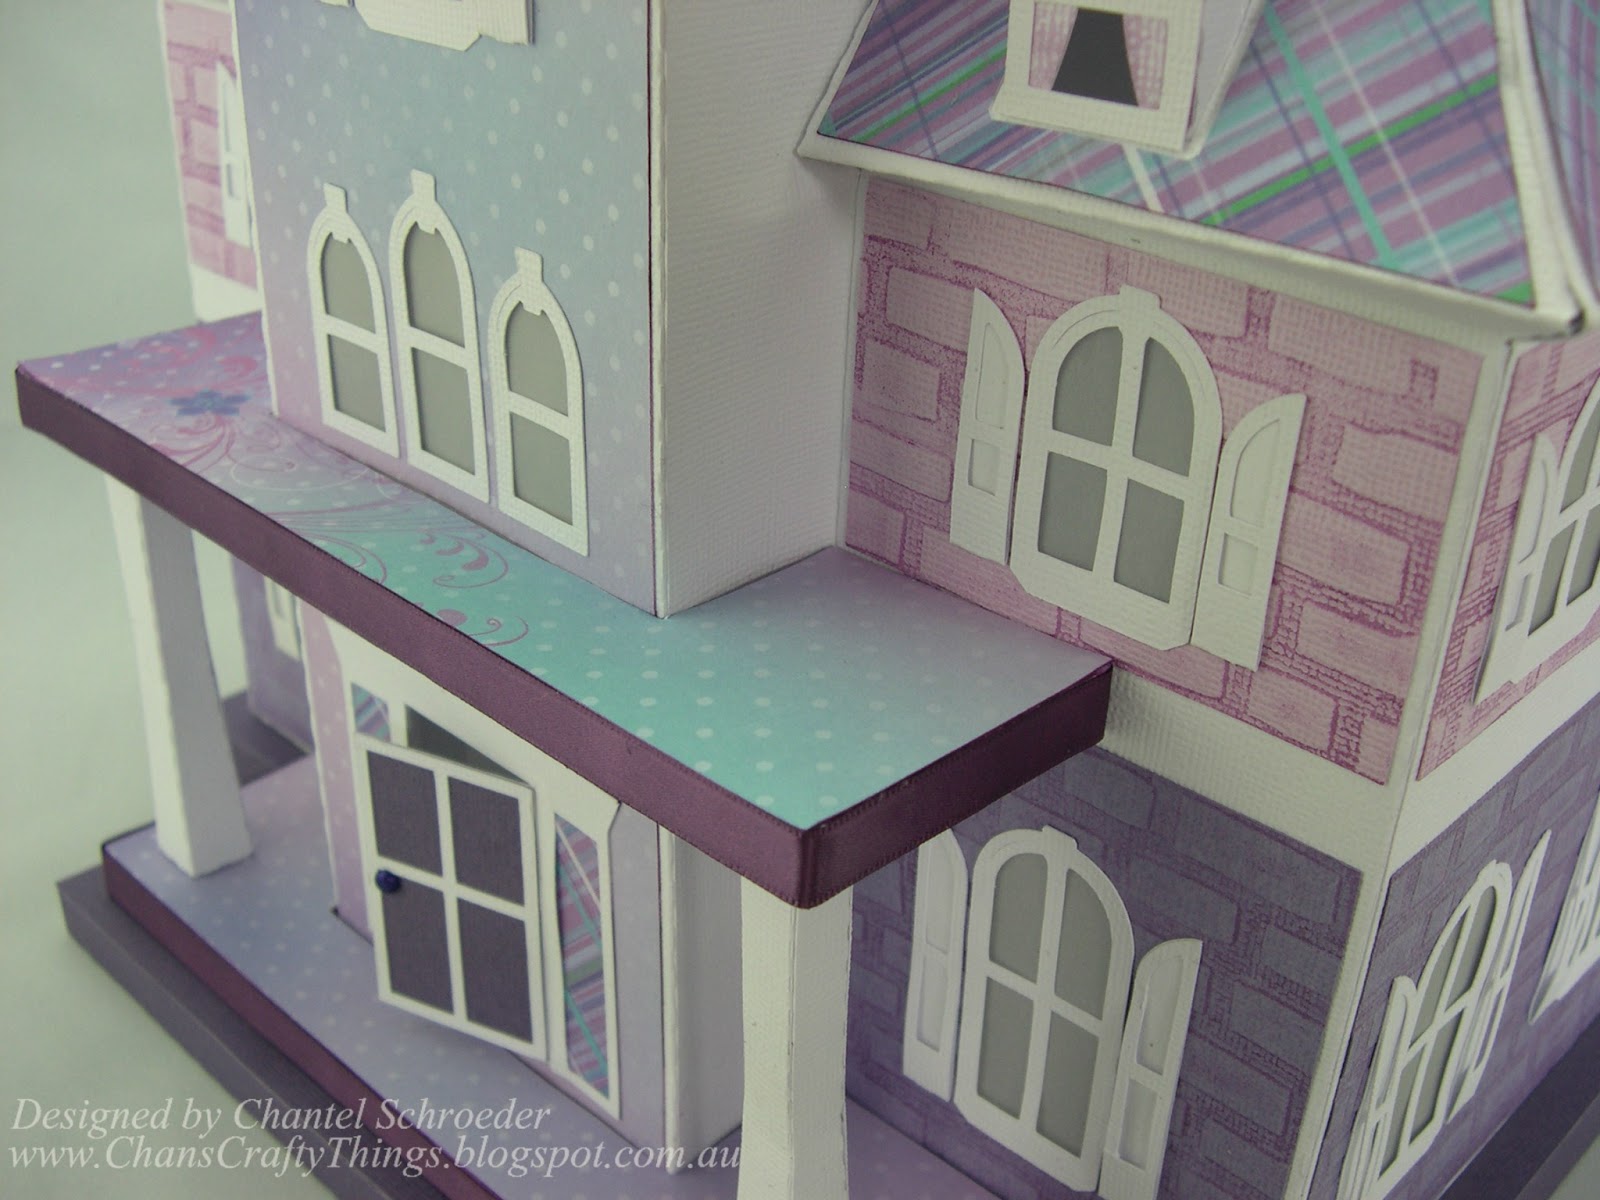
Hi everyone, today I'm sharing a birthday gift I made for my friend's 10 year old daughter a couple of weeks ago. 
The file is from SVGCuts Maple Manor kit.  The kit has a Halloween theme however, as with all SVGCuts files, it can easily be transformed to suit any theme, occasion or season with different types of papers and embellishments.   
I chose patterned papers from the Kaisercraft Magic Happens collection and used AC cardstock for the solid colours.  To add some texture, I used a brick embossing folder, inked the raised edges with Kaisercraft Aubergine ink and then ran it through my BigShot.  With this technique, I was able to get colour on the "grout" only, which makes the embossed "bricks" stand out more.   

At the back of the house there is a flap that opens and the top tower also comes off so it was easy to add few LED tealights.  That said, I had to cut through the front door as I wanted it to open as well.  The picture on the right below is of the birthday girl (Keyra) and the doll house with the lights on - it really looks like someone's home doesn't it...? 
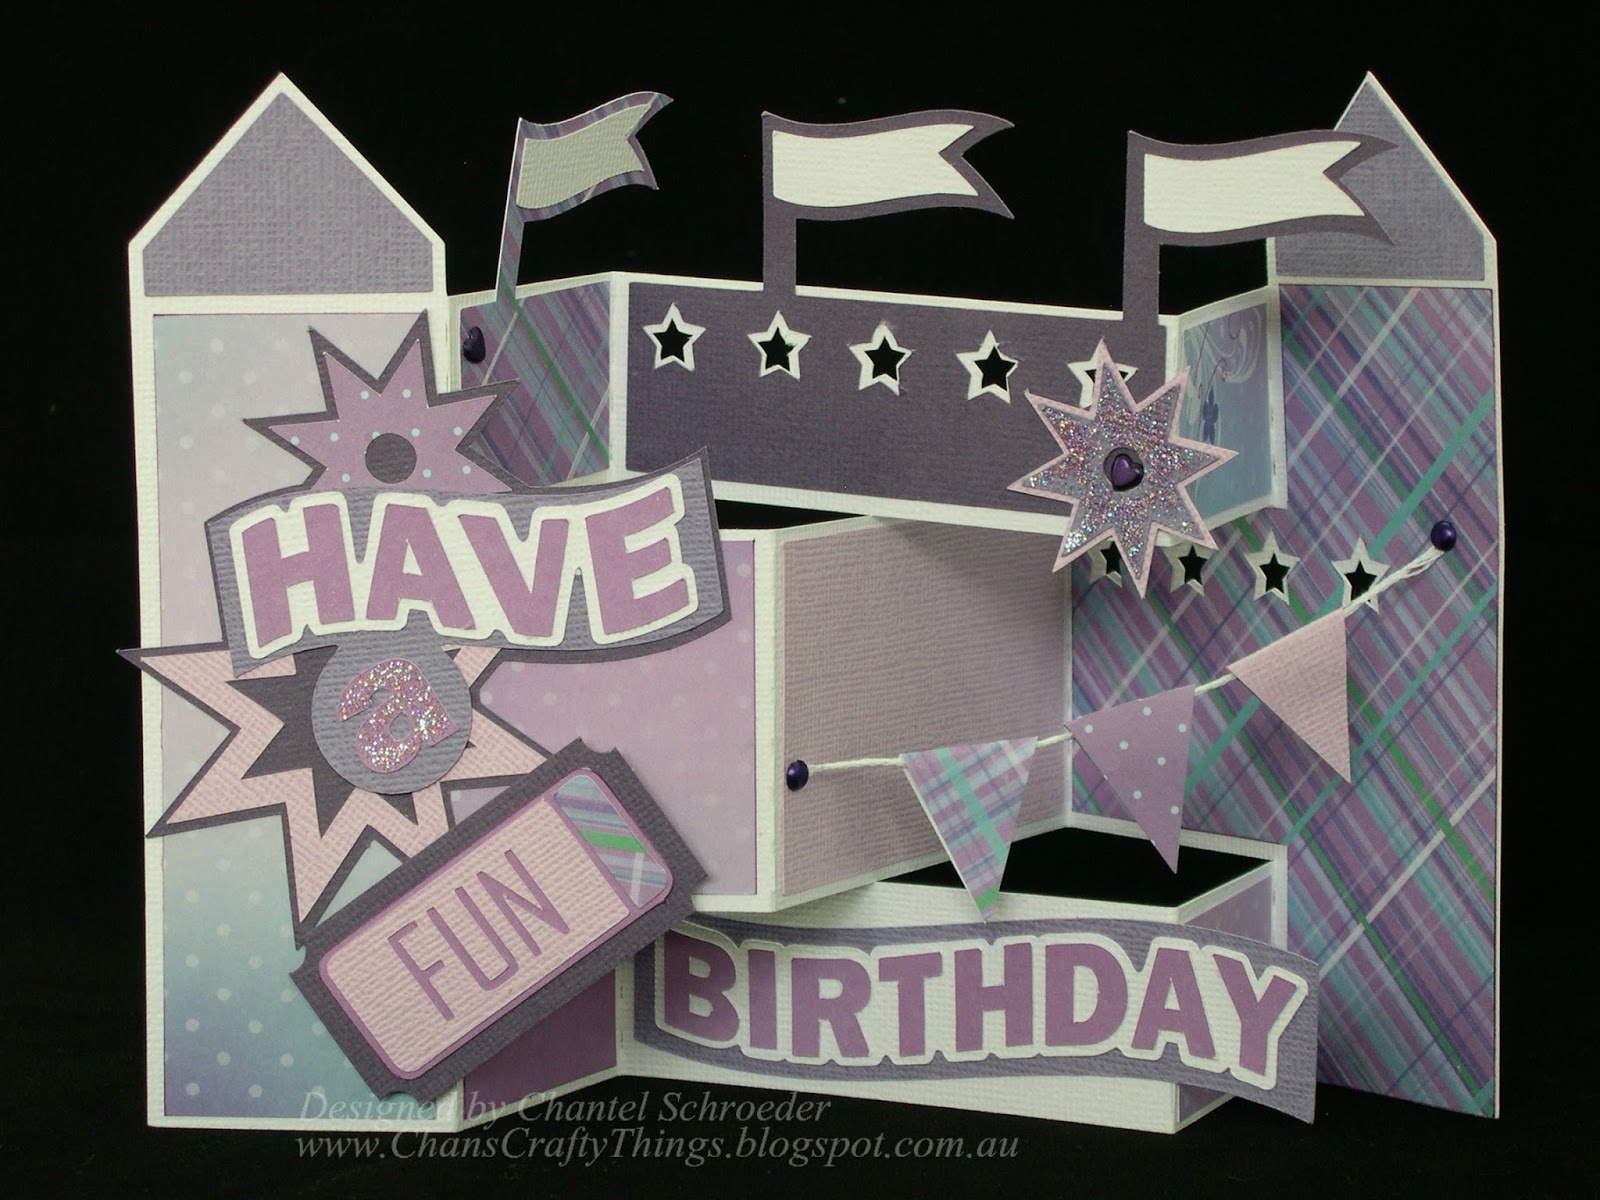
I also made a coordinating birthday card out of the same paper collection.   The card file is from the Summer Street Carnival kit.   
Thanks for stopping by!
 

Image Hosted by ImageShack.us

Sunday 14 July 2013

Antique Book

When I saw Thienly Azim's All in one Valentine it really inspired me to make one of my own. 

I needed a gift for a lady at work and wanted to make something to hold a few of her favourite chocolates.  So, I set off to get the Sprits of Christmas Past kit from SVGCuts and commenced the search for the perfect paper.  I landed on the Le Chateau collection from Kaisercraft and started to cut with my ever so trusty Cameo.  This is what I ended up with...
I added some corners which I found at the Dollar and Sense shop and then added a bird from Kaisercraft with a punched out flower, a pearl and a feather.
This is the inside - It slides out like a match box so I was able to put the chocolates inside.
Good thing about this is that it can be used for storing photo's or other memorabilia after all of the chocolates are gone...


I also made a little "bookmark" tag for the book which I used to add a message.   I just loved working on this project - thank you so much to the very talented Thienly Azim for the inspiration!

Thanks for stopping by!
 

Image Hosted by ImageShack.us


Warm Winter Wishes

Now that I have a blog, I'm able to enter the exciting world of blog hops and craft challenges. 
 
This month, the challenge over at Scrapbook Boutique is to use this picture of a cupcake as inspiration to create a card, scrapbook layout or off the page project.  The theme for the project should be "winter" and the colours brown, turquoise and white is to be used.

When I saw the picture, I thought to myself, all that lonely little cupcake needs is a nice cup of coffee to go with it... and that's how my project started.

I created this take away coffee card and envelope from a file in the Christmas Cheer SVGCuts kit. I replaced the original caption with "Warm Winter Wishes" which I designed in Silhouette Studio DE and then cut out using my Cameo. 
The paper I used is from BoBunny's Snowfall collection - and I just love it!  It's all glittery and sparkly and happens to be the perfect colour combination for the challenge.

For embellishments, I cut out a snowflake from the SVGCuts kit and added some Stardust Stickles for bling.  I then used my 1" circle punch to punch out a couple of elements from the paper for the centres of the snowflakes.  Finally, I cut out a couple of elements for the envelope, added a brad and some twine and finished it off by inking the edges with Brushed Corduroy Distress ink from Ranger for a final touch.
I hope you like it - I sure had fun making it!


Thanks for stopping by!
 

Image Hosted by ImageShack.us


Saturday 13 July 2013

Lollipop Garden

I made this little lollipop garden from the For My Valentine SVGCuts kit.  It was such a fun project! 

The paper is from Upikit (never heard of them until I saw it at my local scrapbook shop) - but isn't it pretty?

The little heart embellishment and the xoxo is part of the SVGCuts kit and I cut them out with my Silhouette Cameo.  The others elements were just punched out of the paper (1" circle and scallop).  What I love about the "garden" is that the "flowers" stand in place using florist foam, hidden inside the little garden box. 

I think something like this will be so cute on the snack table at a birthday party, or even a baby shower?
 
Although right now it's still sitting on the shelf in my craft room.  I think I'll need to start eating the Chupa Chups before they get old...
 
Thanks for stopping by!
 

Image Hosted by ImageShack.us
 

Sunday 7 July 2013

Dino Train

There is nothing more exciting than a birth in the family... I made this set as a gift for my husband's cousin soon after the arrival of their baby boy.

The baby word album and train set are both from Kaisercraft and I decorated them with papers from the DCWV Nana's Nursery, Baby Boy stack (such a pretty stack and perfect for any baby boy project).  My husband picked out the dinosaur to "drive" the train, and we added a few goodies in the carriages.
Kaisercraft Train, Bundle of Joy SVG, Nana's Nursery, Baby Boy stack
The alpha box is from the Bundle of Joy SVGCuts kit and the booties were a free file I found online.  I put a pair of baby socks inside the box as a little surprise.
Nana's Nursery, Baby Boy stack
I've always liked interactive cards so I thought the Baby card from the Waterfall Cards SVG kit was the perfect choice.  The card was the last item I made in the set and it was only when I watched the tutorial that I realised I had used the same paper as what Mary (from SVGCuts) used on hers... 
Nana's Nursery, Baby Boy stack, Bundle of Joy SVG

I love how everything turned out - it looks so cute together!


Thanks for stopping by!
 

Image Hosted by ImageShack.us

Piano Box

I absolutely fell in love the piano box from the Thank you for the music kit over at SVGCuts the very first moment I saw it. 

I had so much fun choosing papers and embellishing this little box.  I added a couple of feathers, some pearls from Kaisercraft and stamped a piece of white cardstock to make the "sheet music".  I love how it turned out. 
I think might just keep this one for myself...  


Thanks for stopping by!
 

Image Hosted by ImageShack.us


Wall Clock

Hi there, I made this wall clock for my craft room.  I used a file from the Maison de Madeline SVGCuts kit and papers from DCWV Alphabet stack.

I Embossed the centre panel for a bit of texture and added stickles for bling on the face.  I also used some foil for one of the gears which I think looks pretty cool.

I saw the clock mechanism at Lincraft and knew it would be perfect for my project. It was so simple to put together.

I can't wait to put it up on my craft room wall when we move into our new house.

Thanks for stopping by!
 

Image Hosted by ImageShack.us


Safari Lamp

So I finally did it!  I jumped on the blog wagon... and this is my first ever post.

I made this "Safari lamp" for a challenge over at SVGCuts using their fabulous Maison de Madeline kit. I am also pleased to say that this little guy won me second prize in the SVGCuts Lamp Challenge!  Whoop, whoop!

I gave my lamp an African theme by using animal print papers and exchanging the fleur element with an elephant, giraffe and rhino from the Zoo Animals collection. I also used hessian instead of vellum to let the light through and added some twine, feathers and beads to finish it off.  
Safari Lamp Front View

Here's a close-up of the lamp shade. I just love all the textures...  
Safari Lamp Close up
Over the coming weeks, I hope to add a few posts of some of my favourite crafty things I've made before I had my blog.  I Hope you stop by again soon to have a look
Thanks for stopping by!


Image Hosted by ImageShack.us